How to use USC CARC
How to use CARC
CentOS Linux
CARC OnDemand
Online access point
file management
Command line shell access
Slurm job management
Access Jupyter
Jupyter
We can code in Jupyter interactive app
Install Jupyter kernel in Conda
Once installed, when launching Jupyter on OnDemand, the kernels will show up on a Launcher tab (File > New Launcher) and when selecting kernels through other methods.
module purge |
Start Jupyter interactive app
To start an interactive session in OnDemand, select the application you want to use from the Interactive App dropdown menu at the top of the OnDemand dashboard.
Once selecting an application, the session creation page appears. Then customize interactive session using the form fields.
Click Launch to launch session. Then this will schedule session in the Slurm queue. On the My Interactive Sessions page, your session will be highlighted in blue with a status of “Starting” or “Queued”.
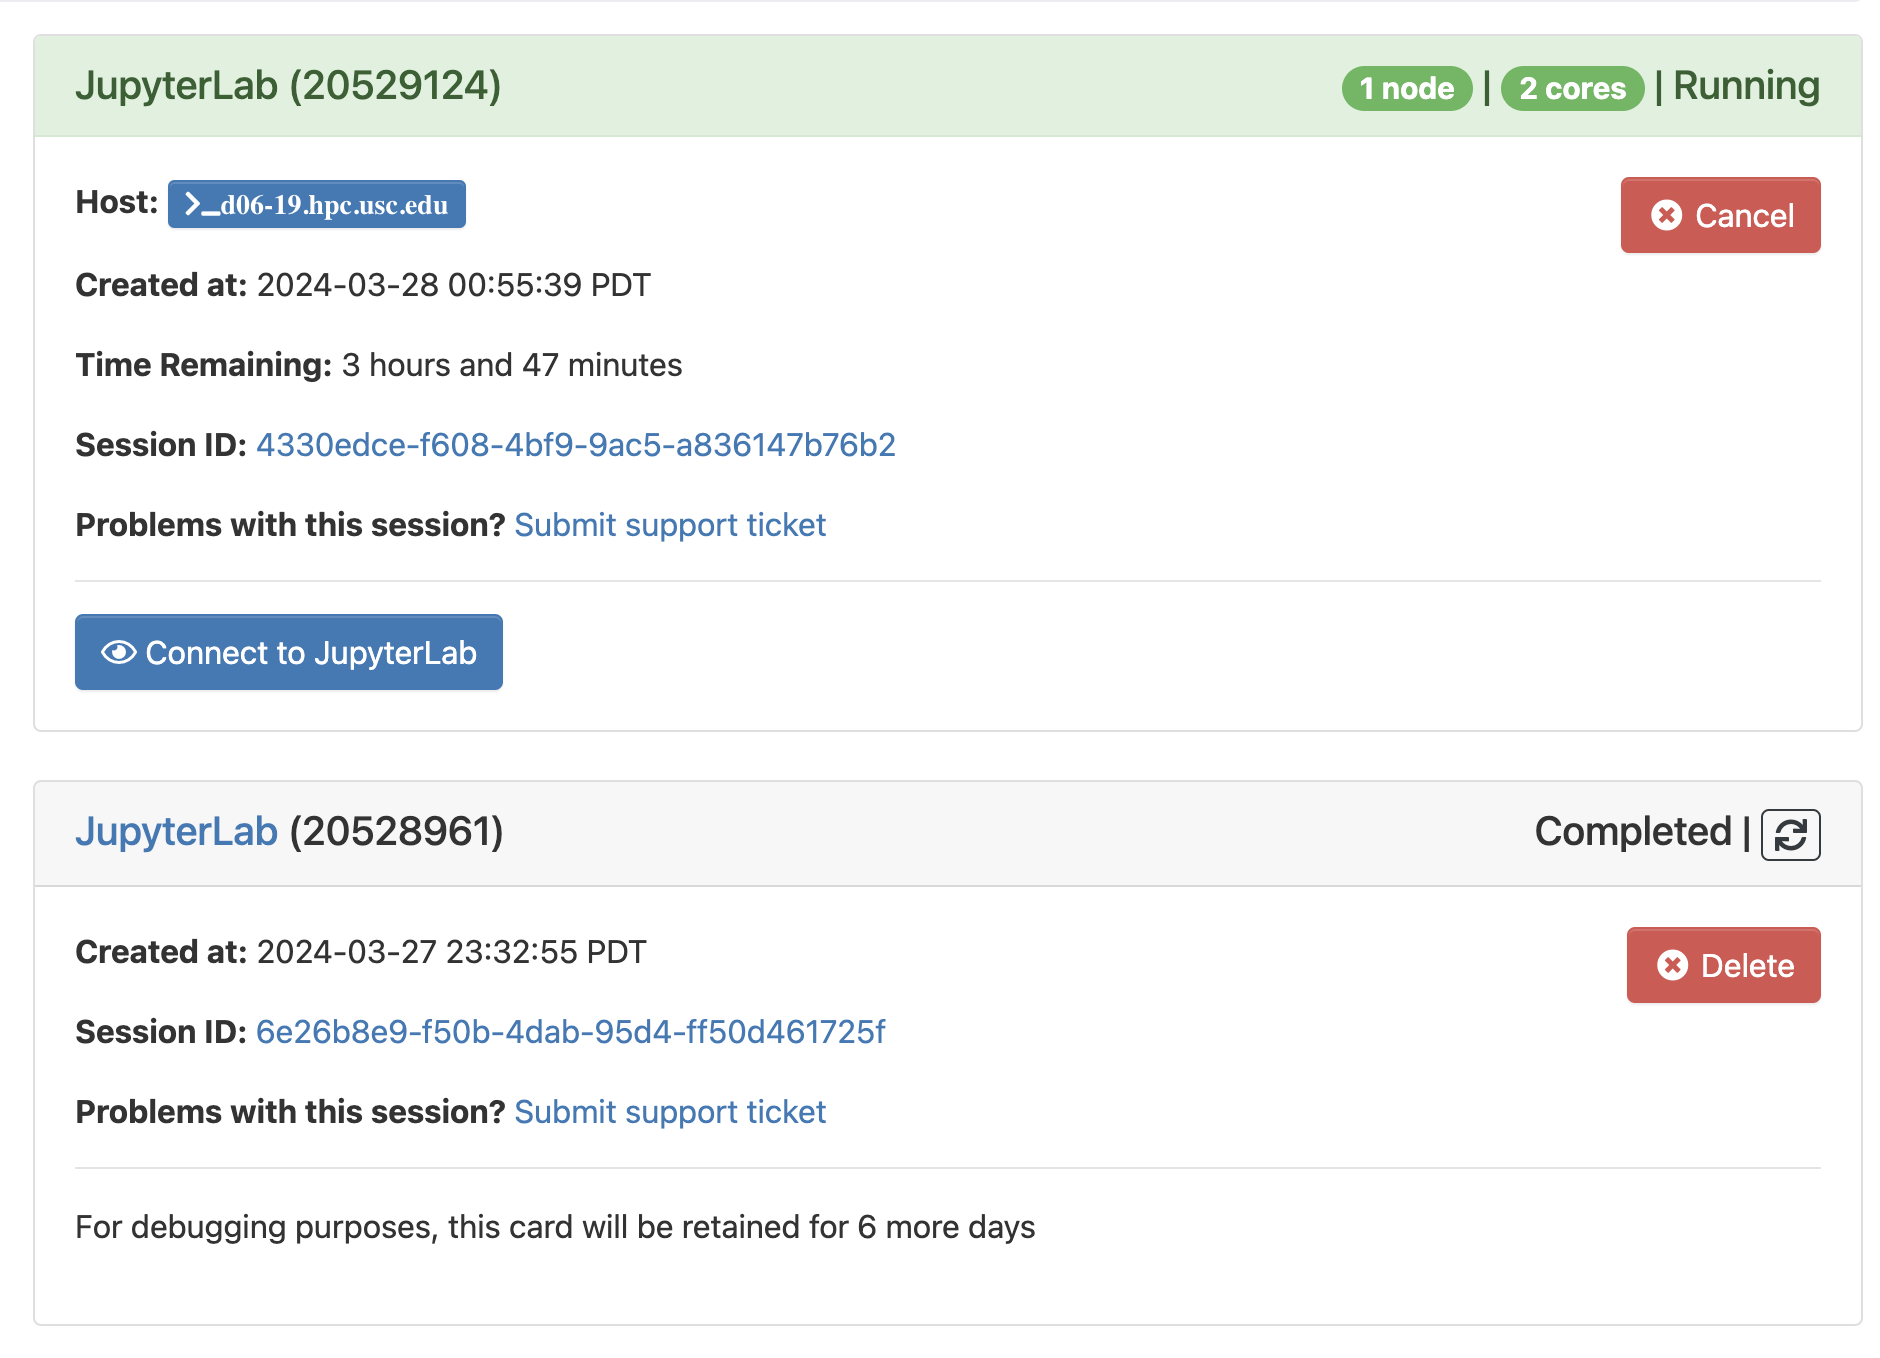
Then click Connect to JupyterLab to interactive page. Then enjoy!
How to connect via SSH
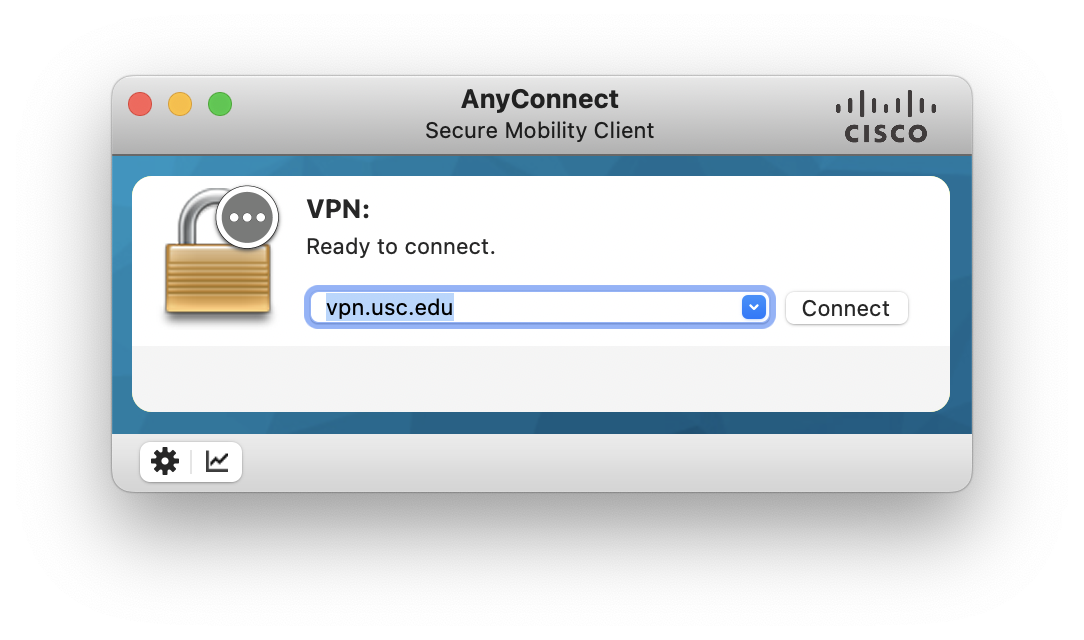
Connect to the USC network or Research VPN
We can download software here.
click Start AnyConnect in AnyConenct page to download and install.
Then connect VPN via vpn.usc.edu
Logging in
We need open a new terminal window and enter
ssh <username>@discovery.usc.edu |
Make sure to substitute USC NetID as the username. After entering this command, input NetID password.
We can also use SSH client, like Xshell, to manage our connects. And We can also use extensions on Visual Studio including Remote - SSH, SSH FS, etc.
After that, we can access our files.
Files
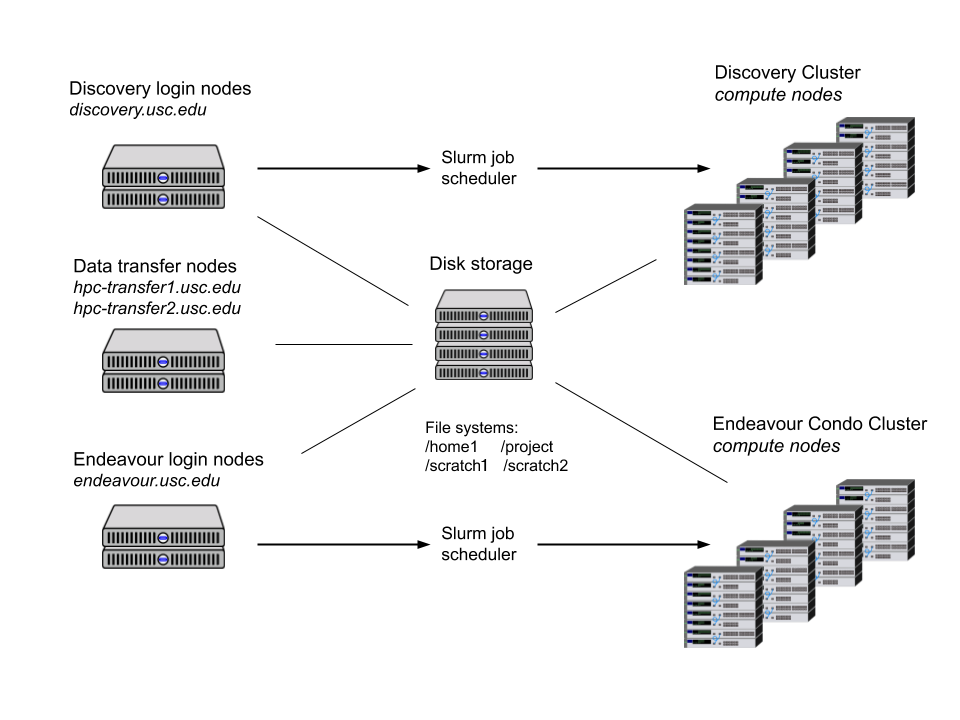
File storage
| File system | Description | Recoomended storage | Activities |
|---|---|---|---|
| /home1/<username> | Each CARC user has a home directory with 100 GB of disk space. Use cd to quickly change to |
Personal files, configuration files | Create and edit personal scripts/programs |
| /project/<PI_username>_<id> | This file system is a high-performance, parallel file system consisting of shared directories for different research project groups. | shared files, software installations, job scripts and files, I/O files | creating and editing scripts/programs, compiling, I/O, transferring data |
| /scratch1/<username> /scratch2/<username> |
These file systems are high-performance, parallel file systems. files stored here should be periodically backed up to decrease the risk of data loss. Use cds and cds2 to quickly change to |
temporary files and I/O operations. | I/O, testing |
Transferring files
CARC has two dedicated data transfer nodes at hpc-transfer1.usc.eduand hpc-transfer2.usc.eduthat are configured for fast file transfers.
ssh <username>@hpc-transfer1.usc.edu |
We can also use OnDemand for uploading/downloading relatively small files.
**Transfer between local and Discovery: ** commands like sftp or rsync
scp file <user_name>@hpc-transfer1.usc.edu:/home1/<usr_name> |
**Transfer between Internet and Discovery: ** commands like wget, curl or aria2c, And Git commands.
If you install tmux module
A tmux process is unique to a node, so if you’re using tmux on a login node, make sure to always log in to the same login node if you want to reattach to previous tmux sessions.
**Initiate seesion: **
tmux**Check progress: **
tmux attach
Edit files
Work in Visual Studio
Or use the nano, micro,vim, or emacstext editors.
Install and Run software
On Discovery, CARC maintains software, compilers, and libraries using the modulesystem.
To see the available softwares
module avail |
If knowing the name of a software package, we can use the module spidercommand to find out if it is available and how to load it.
module spider <name> |
To load software without any further installations.
module load <software_name> |
Install module with Conda / mamba
Conda is a package management system which can be used to create Python and R development environments on many different platforms. Mamba is a drop-in replacement for Conda that is generally faster and better at resolving dependencies.
It’s common that installing packages using Conda is slow or fails because Conda is unable to resolve dependencies. To get around this, Mamba is better.
Check packages list in the current environment
conda list |
check environment
conda env list |
activate environment
conda activate -n <env_name> |
install modules
conda search <module_name> |
Jobs
Discovery computing cluster is a shared system, we use a job scheduler Slurm to manage all requests for resources. The Slurm (Simple Linux Utility for Resource Management) job scheduler is an open-source job scheduler that allocates compute resources on clusters for queued, user-defined jobs.
Use the myaccountcommand to see your available and default accounts and usage for each account.
Test jobs (interactive mode)
First perform some basic tests of your job interactively on a compute node before submitting it as a batch job to the Slurm job scheduler, ensuring that you will have quality results after the job completes.
Use Slurm’s salloc command to reserver resources on a node.
For example, to request 8 CPU and 16GB of memory for 2 hours, enter:
salloc --time=2:00:00 --cpus-per-task=8 --mem=16GB --account=<project_ID> |
Then test by loading the software environment module load xxxand running scripts or programs python script.py. Without the --accountoption, the default account will be used. This is fine if we only have one project account.
*Running conda
module purge |
Exit interactive mode
enter exitin the shell. This will return to the login node.
Submit jobs (Batch mode)
Create job script <job_name>.job
The top few lines of the file (that begin with #SBATCH) specify the requested resources for your program and other options. Make sure to use the correct account in your job scripts. Example:
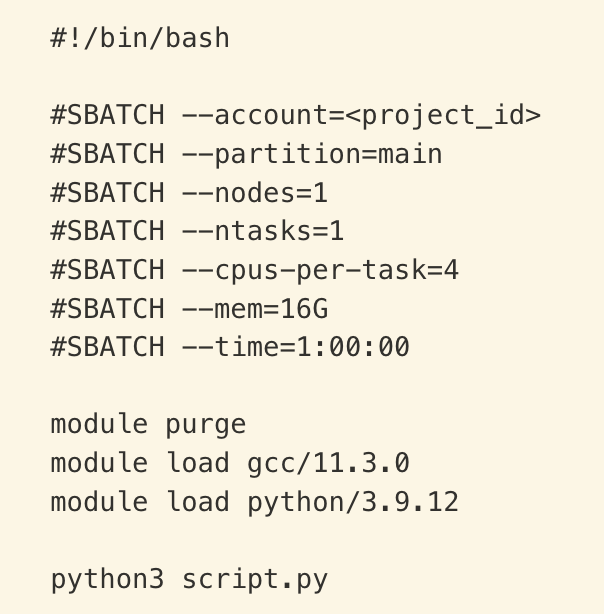
| Command or Slurm argument | Meaning |
|---|---|
#!/bin/bash |
Use Bash to execute this script |
#SBATCH |
Syntax that allows Slurm to read your requests (ignored by Bash) |
--account=<project_id> |
Charge compute resources used to myaccountto view your available project IDs |
--partition=main |
Submit job to the main partition |
--nodes=1 |
Use 1 compute node |
--ntasks=1 |
Run 1 task (e.g., running a Python script) |
--cpus-per-task=8 |
Reserve 8 CPUs for your exclusive use |
--mem=16G |
Reserve 16 GB of memory for your exclusive use |
--time=1:00:00 |
Reserve resources described for 1 hour |
To submit a batch job, use the sbatchcommand. For example:
sbatch <job_name>.job |
Submitted jobs are processed remotely. The process is recorded and written to an output file in the same directory where you submitted the job from. By default, this output file is named slurm-<jobid>.out.
*Running conda in Batch Mode
Create an application script. Then create a Slurm job script that runs the application script. Finally, Submit the job script to the job scheduler using sbatch.
#!/bin/bash |
Monitor jobs
Use the squeuecommand to view the status of jobs
squeue --me |
Cancel jobs
scancel <job_ID> |
The job may remain in the queue for a short time, but its status will change to “CG” (completing) or “CA” (canceled).